Showing posts with label Craft. Show all posts

Sunday, 21 July 2013

Quick knits

Hello again everyone,

Thank you very much for your kind messages on my knitted socks last week. They gave me enough confidence to maybe attempt knitting a third pair...at some point in the future :-)


I had some sock wool left and decided to attempt knitting some cute little baby booties for a friend's baby. I used a pattern found in this book,

, a book that had been gifted to me while I was expecting Baby Suisse and which I had already used to knit him a woolly hat last winter. I really like the colour of the booties although I can't believe how small they are (how quickly one forgets how tiny babies' hands and feet are). Using some more wool I had kicking about in my stash, I decided to slightly adapt the pattern for a hat I had used in the past for myself (which you can also find on Ravelry, follow my link on the side of the blog) and which I posted on Handmade Monday in October 2011.


The giant button on the front of the hat has always been my favourite part of this hat. It is obviously to big for the little baby girl just now but it'll be handy to survive the Glaswegian winter in a few months time. Once again, waste not, want not, I used the left over wool to make a neckwarmer for one of my nieces for this winter too (pattern found on Ravelry page once again). 


All items have been posted to their new home this week. After the socks' debacle, it was very satisfying to get not 1 but 3 projects done in a short amount of time! And no, there's nothing wrong with being a little bit smug from time to time :-)

Come and join me browsing at Handmade Monday!

Saturday, 13 July 2013

Once bitten, twice shy... not I!

Despite my best intentions, I have actually managed to set a new record for the longest WIP project on my knitting needles after 2011's disaster of my first pair of knitted socks. That first attempt had taken 6 months and I had sworn never to bother with socks again.


But it's true that home-made socks are so warm and comfy in winter, and I thought that I was bound to improve my timing with the second lot...ha,ha,ha...erm...
Started in October 11, I had managed about half a sock by the time I got pregnant with Baby Suisse. As the first trimester of my pregnancy was spent wanting to sleep, and the subsequent two were spent pretty much the same way, I got very lazy craft-wise and half forgot about them. I then had dreams of a super productive maternity leave during which I could sew/knit/cross-stitch/bake/have a life and those dreams were fairly quickly shattered. Four months is not a long time and I was then off to work. To cut a long (and boring) story short, I got annoyed with myself for letting this happen again in February 13 and I picked up the project and finally finished it in July. Yep, a whole 20 months later...


At least, I had learned from my mistakes this time and grafted the toe properly! Looking at Baby Suisse's socks, I still feel his are way cooler! Nevermind...and yes, it is another ball of sock yarn in my craft cupboard...please don't ask me why! (or when!!)

Pop over to Wendy's super blog for some "up to date" craft in Handmade Monday :-)

Sunday, 23 June 2013

IKEA meets Africa: a one of a kind play blanket


With summer officially gracing us with its presence last week (he has since decided to go on holidays somewhere else), we had been spending a bit of time in the garden. Baby Suisse love playing outside bare foot on the grass and splish-splashing in his paddling pool. I had been on a look out for an outdoor blanket in our local supermarket in May but could not find any. Mind you, they have only recently started displaying them so they must have been waiting for warmer days too!I saw blankets in charity shops but I wanted something that was water resistant and not too warm to sit on...

During a trip to IKEA last May, while walking past the fabric aisle (my favourite aisle ! ), I saw that they had some nice strippy outdoorsy fabric, the plastified kind that you can use to make table cloth with for your garden furniture. I had bought some in the past to make the lining for a beach bag and realised it would also be perfect for what I had in mind!


I bought 150cm of the stuff and decided to use up some fabric from my "African stash" which I have used for plenty craft projects before: read more about it here, here and here. This particular fabric came from a market in Senegal. I have shared with you in the past some of my African adventures (pre- Baby Suisse days) when I was very fortunate to spend 4 years on and off working in various parts of Africa. I have done posts on my travels through Tanzania (here and here), Zanzibar and Uganda...maybe I'll take the time one day to share with you my pictures from Senegal, Ivory Coast and Ethiopia.

No fancy design or stitching, I just cut a piece of African fabric about 8cm smaller all around than the plastified lining, made a border as well as I could without worrying about how nice the corners would turn out and quickly machine-stitched all around. When I occasionally manage to get a bit of free time to myself to craft, it never is for more than 30 minutes so I need to be able to do the whole project in a short amount of time without overly worrying about perfection. The end result does look "home-made" but I would never get anything done otherwise!


And here it is, a perfectly suitable and one-of-a-kind summer play blanket for Baby Suisse. I wanted to take more photos of the finished product and have a mini artsy photo-shoot with toys and all...yeah that never happened due to lack of time and cooperation on Baby Suisse's side. Apologies if this post is a little bit poor photo-wise, must try harder next time!

Right, I am off to share this on Wendy's Handmade Monday. I haven't posted there on a while due to lack of crafting time so it will be nice to catch up and see what other bloggers have been up to :-)

Monday, 12 November 2012

Snuggle blanket

Happy Handmade Monday!
 
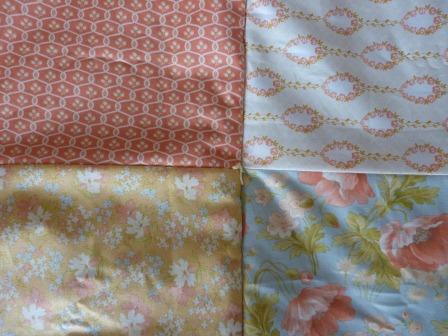
Inspired by the mini-quilt I made last year and by how simple I had found the whole process, I decided to use some of my left-over Buttercup Moda Fabric to make another little blanket for one of my nieces for Christmas.
 
I simply love the fabric squares from that collection, the colours are so beautiful...


I am genuinely thinking of getting some more of these squares to make myself a double bed spread!
 
The problem with making the quilt was that I did not really have a backing fabric that matched the beautiful Moda fabric and that I could also use to make the quilt border. I wanted to use some of the fabric I already had without having to buy anything. I found an old Barbie fitted sheet from my childhood (which my Mum had kept for some unknown reason) with pink and white stripes which I thought looked nice and girly but clashed a bit with the front of the quilt.


While I was looking through online tutorials to remind myself how to make quilt borders, I came across the Red Pepper Quilts blog and a tutorial on how to make a quilt without binding. That solved my problem nicely! No need for borders and not as fiddly as I thought it could be, the front and the back of the quilt do not need to perfectly match, they can both have their own "style".


Another success I would say, using fabric I already have and learning a new technique!


I hope my niece will like it :-)

Join me on a craft tour over at Wendy's Handmade Harbour .

Wednesday, 7 November 2012

Not quite like in the picture...

When a friend lent me a sewing book a few weeks ago, I had a bad case of "Why doesn't my house look like this?"


This book is very inspiring although you may just get depressed flicking through it for too long as there is no way that any normal person I know (with a day job, children, messy dogs, a budget...) can have a house that looks so effortlessly stylish.

Anyway, while I knew that the overall look couldn't be achieved, I thought that I'd give a try to these little sea creatures to cheer up my bathroom.

Picture from Sew Sunny Homestyle book

Blame it on the fabric I chose, on the fiddly shapes or the lack of detailed clear instructions for the shells (or blame it on the boogie...) but this is what I now have in my bathroom...


Not quite like in the picture as I said... but at least I got to use some of my stash of African fabric that have been lying about in my cupboard for over 2 years now!

Hip hip hurray to half-successful sewing projects :-)

Sunday, 4 November 2012

Gardening bear


Happy Handmade Monday everyone,

I am very happy to be able to share with you my biggest cross-stitch project to date...my little gardening bear! It is by no means a giant bear but it has taken me a rather long while to get finished...mostly because of my laziness!


Earlier this year, I was very kindly given a whole lot of cross-stitch stuff from Mr T's Nan. It included a little kit to make this cute little guy.


A few months later, a frame was bought to showcase this little achievement of mine:


Small in size but not in the number of hours it has taken me...I am not sure I am ready to take cross-stitching to the next level??!

I am keeping this post short as I am suffering from a very bad case of burning chilli hands after cutting and deseeding a subtantial amount of chillies to make preserves. I will write about these once I'll be able to properly feel my fingers again!

Please pop across to Wendy's blog for Handmade Monday :-)

Monday, 29 October 2012

Baby Suisse proudly presents...


There are yellow and green stripes and what I call "waffle" stitches...


Both items were quick to knit and much needed now that la Suisse has entered winter...


The pattern for the hat can be found in this lovely book full of ideas for babies (yours or your friends...)

The hat I knitted is the one featured on the cover albeit with only 2 colours
100% Baby Suisse approved!


Join me in Wendy's Handmade Harbour to discover some inspiring blogs :-)

Sunday, 16 September 2012

Photo board

Happy Handmade Monday everyone,
 
This week's project cost me absolutely nothing which was brilliant as I just used up things I had lying about the house. I was inspired by a piece of polysterene found in an old IKEA package...yes you read me right!


I thought that with a bit of glue and some fabric I had left over from previous projects (cat cuddly toy and toy bag), I could turn this polysterene rectangle into a nice photo board for Baby Suisse's room, and within about 5 minutes, I did!


I cut a piece of fabric slightly wider than the rectangle, trimmed the corners and carefully folded them over before gluing into place.


And that's how it looked from the front:


All that was left to do was adding two pieces of ribbon and some craft pegs to hold pictures in place et voilà!


Cheap and cheerful! The crowd over at Wendy's Handmade Harbour probably have slightly more skillful projects to share with you :-)

Sunday, 9 September 2012

Dragon mobile part II

19/03/2012 Dragon mobile part I

Good morning everyone and welcome to Handmade Monday!

I can't believe it has nearly been 6 months since I first posted about this project. As always, I started with buckets of enthusiasm which somewhat fizzled out very rapidly. I am not even sure why it has taken me 6 months to complete this mobile as it is far from complicated and even though there is quite a bit of hand-sewing involved, it isn't rocket science!
 
I feel that I have to start from the beginning again as March is a long long time away even for you readers who undoubtedly have been gifted with a better memory than I!


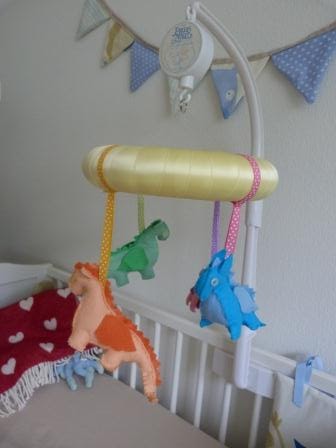
I used a polysterene ring covered with ruban to hang my dragons from. That was the easiest (and quickest!) part. Thanks to the wonders of Google, I came across this fab tutorial for felt dragons and my first dragon was born that very same day.


Fast forward 3 months and I still only had one more dragon to my tally as I got side-tracked with other sewing project.


Fast forward another 3 months and Baby Suisse had arrived early and the mobile was still half-finished...not good! Enthusiasm was finally rekindled last week when we had a friend staying over and the mobile was finally ready for its big reveal after a couple of hours work.


All that was needed was some transparent fishing wire to hang the ring to a mobile arm which had been bought second-hand and attached to the bed et voilà!


YEAH!!! Some of you may also spot the new bunting I made for Baby Suisse's room with the same fabric I used for his cot-bumper and toy bag.


Phew... that's me all crafted out for the weekend. I'll grab a cup of coffee and go over to Wendy's Handmade Harbour to get some inspiration from wonderfully gifted peeps :-)

Wednesday, 29 August 2012

Something to look at...

I must admit that the concept of knitting tea towels seemed very strange, if not pointless, the first time I came across it...surely you wouldn't want to wipe and dry your hands on something that has been knitted...


I then saw pictures of knitted tea towels on Ravelry (don't forget you can click on the Ravelry button on my left handside bar to find me there) and decided to give the Mitered Hanging Towel pattern by  Cristina Bernardi Shiffman a go. That was almost 3 years ago and a few weeks back I completed my third knitted tea towel.


Not that I have changed my mind about drying my wet hands on them...I just like to see them hang in my kitchen but I would never dare use them as tea towels. Is that sad?? (well, actually you don't have to reply to that one).

Am I the only one making things and then not using them as they were intended because they're too pretty?

Sunday, 29 July 2012

Because he's worth it!

After 18 months of car-free living in La Suisse, the eminent arrival of Baby Suisse has convinced us that it was time to get a car again in order to be able to travel around a bit more easily at the weekends and, more importantly, to be able to look for nurseries slightly further afield from Brugg. As Alf is part of most of the trips we take at the weekends, we need to equip the car with a suitable crate for him to go in the boot. I thought that Alf could also do with a bit of comfort and his own travel blanket to snooze on during his travels in the car.

All that was needed was some spare fabric, some batting left-over from when I made the cot-bumper , 30 minutes and a willing Alf to model the new blanket.


I roughly measured my dog, estimated the length the travel blanket should be, cut 2 pieces of fabric and 1 of batting. Put the 2 pieces of fabric right sides together and put the batting on top. Sew all around it leaving a suitable gap to turn the blanket inside out.


Turn the blanket inside out and sew the gap shut


You should now have a blanket!


To hold the batting in place, I tied some knots throughout the quilt with some wool. An alternative would be to machine-quilt the blanket but I do not have a quilting foot and these knots should do the trick.


As they say, the proof is in the pudding...


Because Alf is quite partial to bandanas and I had some fabric left, I decided to sew him a matching bandana! Here's some more posing:

Why do I have to sit still?

This photoshoot is taking far too long!

I've had enough now!
Let's go and see if anyone else over at Handmade Harbour has been spoiling their pets this week!
Related Posts Plugin for WordPress, Blogger...